

Guide to Taking Impressions at Home Instructional Video
Taking your own dental impressions can feel a little intimidating, especially if it’s your first time—but don’t worry, we’re here to help.
If you’ve already watched our instructional video and reviewed the step-by-step instructions on our website but still have questions, please reach out. Our team is happy to provide additional guidance, and in some cases, we can even walk you through the process during a live Zoom video call.
For your safety, dental impressions should not be taken if you have anything in your mouth that could make the impression material difficult to remove. This may include braces, orthodontic wires, teeth that are significantly crooked or overlap in a way that could trap the impression material, bridges with large enclosed spaces between the restoration and your gums, or similar situations.
If you’re unsure whether taking your own impressions are right for you, we’re happy to help. Contact us through our online chat or email us at info@CANAwhite.ca, and our team will be happy to answer any questions before you get started.

Step by Step - How to Take your Own Dental Impression!
Step 1 - Watch the video Instructions
the instructional video is found near the top of this web page or by simply using the QR code below. If you have already watched the video then great, you can proceed to step 2!
Step 2 - Follow the easy prep steps below
- Brush & Floss your teeth
- Clean your Hands
- Get a Timer Ready
- Get a Towel for incase you drool (it happens...)
- Get your Trays and putty out in prep for the next step
Step 3 - Size the trays
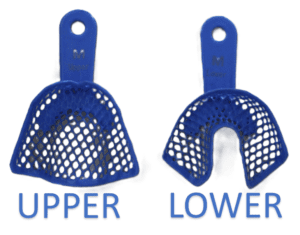
There are 2 upper and 2 lower trays in your kit for you to take a total of 4 impressions. Try the trays in your mouth one at a time. If its too snug on your teeth or doesn't cover up to 2 of your back molars, notify us right away through our online chat or email us info@canawhite.ca and we'll rush out a better-fitting set of trays.
Step 4 - Mix up the putty
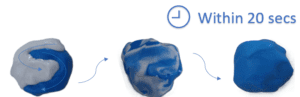
To make the mould, mix the white and blue putty together using your hands until they are one solid colour. Do not roll the putty, fold the putties both over and over again with your fingertips. Once you begin mixing you have to work quickly, you have 20 seconds to mix.
Step 5 - Roll and Place Tray Putty in a U-shape
Okay NOW you can ROLL the putty into a uniform cylinder or 'log shape' that is approx 10 cm long.
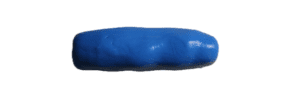
Place the rolled putty into the tray following a U-shaped pattern. Do not smush the putty into the tray or flatten it (your teeth will do this for you in a second!). You have 40 seconds to roll and place the putty into the tray.
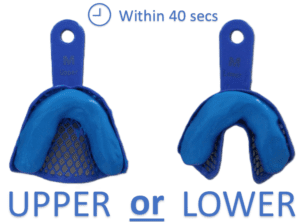
Step 6 - Time to take your Impression
Use a mirror to look and align the tray properly in your mouth before pressing into your teeth. Bite down gently, stopping once your teeth lightly hit the tray and hold the tray in place for 3 minutes to let the putty harden. Do not move or talk for the 3 mintues the putty is in your mouth. Stay as still as possible with your fingers holding the tray in place. Only use the tab to remove the tray.
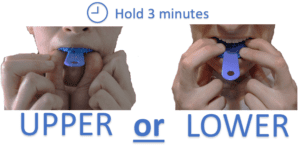
Step 7 - Do it all over again!
You got at least one down so good job and you can repeat the process until you've completed all 4 impressions! Compare each of your own impressions to our good and bad examples of impressions provided. If you can identify what didn't go so well on your impression then you can try to improve upon it in the next one. We want you to send us back all 4 impressions even if they have defects.
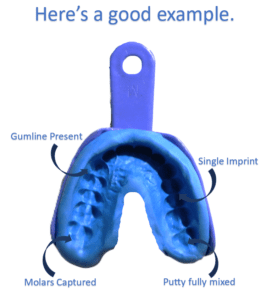
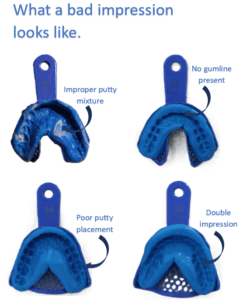
Step 8 - Verify your Impressions are good before sending 🙂
Send photos of your impressions to verify@canawhite.ca to have one of our quality assurance team members review your impressions. If your impressions are approved then you can proceed to the final step!
Step 9 - Ship them back
Great job, we're almost done! Don't remove the putty from the trays, you'll simply put your impression trays in the box. Don't put anything else inside the box. It's ok if the impressions rattle around, they are resilient. Throw away the putty containers and the rest of the contents except for the Name ID card and the sticker close-label. Please fill out this Name ID card and enclose it in the box so we know who's impressions these are!
Apply the sticker close-seal to outer side of the box to securely seal your precious impression contents in the box.
The return shipping label is already attached to the bottom of the box. Simply drop-off your completed impression box at a Canada Post office. For drop-off locations nearest you visit canadapost.ca or call 1-866-607-6301.

Step 10 - That's It, You're ALL Done!
............ AND now we patiently wait for our dental lab to receieve your impression kit and get working on your Custom Dental appliance!
For general questions please email us at info@canawhite.ca
